| 4.4 Cross Country Trails and Ski Touring
This section includes ski touring, cross-country siding, and racing
trails. Ski trail design has evolved into a sophisticated art in the last
decade, with specific requirements for a variety of skiing activities.
Trail planning, design, construction and maintenance needs differ from
hiking and other summer use trails, although some trail types are suitable
for all season use. Refer to Cross-country and Ski Touring Development
Guidelines - B. C. Parks for more information on standards, signs and
maintenance.
Design a Suitable Trail Type
Each type of cross-country siding or ski touring trail may be graded
as Easiest, More Difficult or Most Difficult. The
4 trail types refer to design, construction and maintenance standards,
not necessarily difficulty. See also trail Grades, below.
Type I: Cross-Country Skiing Racing Trail
-
Develop trails to the high standards required for cross-country ski racing.
-
Conform to Cross Country Canada (C.C.C.) regulations on length, grade and
width specifications.
-
Design racing trails for one-way siding.
-
Intensive Recreation Zone
Type II: Cross-Country Skiing Trail
-
Develop trails for day use cross country siding, not necessarily to racing
standards of length and difficulty. Conform to minimum widths and grades,
depending on grooming equipment.
-
Provide a variety of routes with different degrees of difficulty and distances
and can accommodate a wide range of skiers. Design trails for partial day,
or full day use.
-
Provide groomed trails for classic and free technique. Design trails wide
enough for double tracking.
-
Natural Environment Zone
-
Intensive Recreation Zone
Type III: Packed Skiing Trail
-
Develop trails for cross-country siding on a day use or overnight basis.
-
Allow for moderate to light use, usually on a one way loop.
-
Consider using suitable existing summer hiking a-ails, where grades, trail
width, and elevation gain or loss is reasonable.
-
Groom trails occasionally or not at all. Rely on skiers to set tracks.
-
Design trails for classic technique, may be in a backcountry setting.
-
Consider planning Type IV trails in conjunction with backcountry cabins.
-
Natural Environment Zone
-
Wilderness Zone
Type IV: Ski Touring Route
-
Develop a system of routes over an area undefined by trail markings or
grooming. The wilderness skier is a route finder, often using map and compass.
-
Consider marking the route at intervals with brightly coloured wands placed
upright in the snow.
-
Consider planning Type IV routes in conjunction with backcountry cabins,
where appropriate.
-
Wilderness Zone
Layout and Length
-
Locate ski trails in areas where the snow cover is consistent for several
months. About 60 cm of snow will adequately cover rocks and logs. Steep,
open, south facing aspects are the first to lose their snow. North-facing
aspects are more exposed to prevailing winds. Consider trail locations
along the lee side of hills, in wind sheltered valleys and tree shelter
for skier comfort and to reduce drifting and wind packing. Provide at least
a partial vegetation screen on south or west facing ridges and slopes to
reduce trail icing and drifting.
-
Use the satellite loop, stacked loop, spoked wheel and maze forms since
they provide a variety of routes differing in length and ability level
to accommodate a wide range of users. Design the base loop in a trail system
as the easiest trail to accommodate novice skiers. Provide a number
of routes for full and partial day use, with outer loops designed as the
most difficult trails for advanced skiers. Maximize the number of one-way
trails.
-
Provide a wax testing and warm-up loop next to the trailhead and parking
area .
-
On Type I and II trail systems, provide a flat or gently undulating open
area for instruction and race starts.
-
Select trail lengths in accordance with the number and type of skier and
the expected type of use. Day use packed trails differ from racing trails.
Backcountry packed trails or touring areas have specific but less rigid
requirements. Full day use may range from 22 kin for average skiers to
36km for fast skiers.
-
Consider these user categories to estimate trail lengths and siding times:
- slow tourer
- average tourer
- fast tourer
- racers |
4 - 5 km/h
5 - 6.5 km/h
8 - 9.5 km/h
9.5 - 13 km/h |
-
Provide 3-5km long Easiest trail loops for a siding time of about 1 hour.
Provide longer More Difficult and Most Difficult loop options
for advanced skiers, up to 13-5krn for a 1-1.5 hour ski. Advanced skiers
may travel 30-50km in an outing.
-
Design smooth curves that allow rhythmic siding. Avoid long straight sections
of trail. Align the trail near attractive winter features such as open
marshes, open aspen forests, or creeks.
Grades
Trail grades help categorize different levels of route difficulty. Design
suitable trail gradients as a key part of ensuring safe and enjoyable siding.
Once the trail route flagging is finalized, consider cutting a 1 m centre-line
to check gradients and curves. Measure grades with a hand-held clinometer.
Use a basic formula of about 1/3 level, 1/3 uphill and 1/3 downhill topography
in laying out the ski trail. Ensure trails closest to parking are the
easiest, with level terrain. Use the guidelines for these nationally
recognized categories of trails. Apply these guidelines to Type I (racing),
Type II (cross-country siding), and if desired to Type III (packed trails).
Type IV trails require route finding skills and in most cases should be
graded as Most Difficult regardless of terrain conditions.
Easiest:
-
Do not exceed a 10% maximum grade on downhill runs, ensure that the average
grade does not exceed 5 %.
-
Make slope surfaces smooth, and curves wide and gentle.
-
Design several short slopes in preference to fewer long slopes since to
retain slow speeds and make climbing easier.
-
Avoid descents with steep sideslopes.
-
Avoid exceeding a 5m elevation gain on single vertical climbs. Limit total
climbing over a 3-5-km trail distance to no more than 100 m in elevation.
More Difficult:
-
Do not exceed 25% maximum grades for downhill slopes. Average slope grades
should not exceed 18%.
-
Curves may be sharp, but leave ample room for skiers who overshoot them.
-
Avoid downhill sections that let skiers accelerate beyond controllable
speed.
-
Allow for up to one-third of the trail to be uphill with some steep but
short climbs.
-
Avoid exceeding 75 m in elevation gain on single vertical climbs. Limit
the maximum overall climb to less than 600 m over the length of the trail.
On shorter trails over a 5 km distance, limit elevation gain to 35 m.
-
Design trails between 5 and 15 km in length.
Most Difficult:
-
Do not exceed a 40% maximum downhill grade.
-
Allow for more curves and undulating surfaces.
-
Provide adequate runout distances at the bottom of steep or long slopes.
-
Allow for up to one-half of the trail to be uphill.
-
Limit single climbs over a 15 km distance to 100 metres in elevation.
-
Design trails longer than 15 km in length, with the total vertical climb
not exceeding 1,500 m.
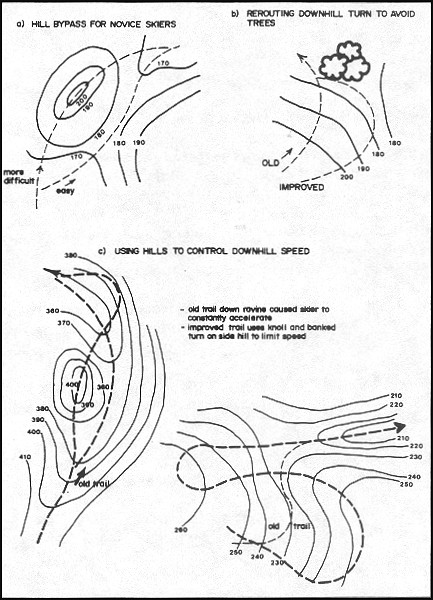
Design Safe Trails on Slopes
-
Design smooth widely arcing curves on hills that will allow skiers to stay
in the track. Tilt sharp curves to the inside, at a slope not exceeding
5%. Widen the trail on curves.
-
Avoid sharp blind comers on steep slopes where natural hazards such as
large trees or rocks are located next to the trail. End long hills with
a level section to reduce speed. Provide level rest and speed check areas
on long slopes. Avoid placing intersections at the bottom of steep downhill
runs.
Figure 4: Tips on Cross-Country, Ski Trail Layout (from Ontario
Ski Council)
-
Consider a level or uphill trail at the beginning of a trail system to
allow skiers to warm up. Poor light and icy conditions may prevail in the
late afternoon when skiers are tired. Place easier runs near the end section
of the trail.
Plan and Clear Trails to Allow Optimum Snow Cover
-
Avoid south or southwest slopes to prevent early snow loss, crusting conditions
and increased maintenance costs. If south facing ridge-tops or slopes must
be used, locate the trail behind a screen of trees. Provide occasional
openings for views if desired.
-
Avoid large open marshes, poorly drained areas, and lakes as these are
prone to windy conditions, shorter season of use, and wet or icy spots.
Balance these problems with the aesthetic advantages of providing variety
in terrain.
-
Right of way clearing widths depend on the trail standard. Packed Trail
(Type III) requirements are not as exacting as those for groomed cross-country
skiing (Type I and II).
-
Use 1.5-2.5 m clearing widths for Type III single-lane packed trails, up
to 3 or 4m for two-way trails depending on the grooming equipment to be
used.
-
Use a 3 m clearing width where grooming will be done by snowmobile, for
example on Type II or III trails. Use a 5 to 6 m clearing width for Type
I trails to be groomed by large specialized equipment such as the Piston-Bully.
-
Allow for sufficient clearance to herring bone or side-step up hills. On
slopes exceeding 10%, use a 3 metre minimum width.
-
Clear to height of 2.5 m, plus the expected maximum snow depth. In coastal
areas the snow depth may be 2-3 m or more, resulting in a required clearing
height of 4.5- 5.5 m.
-
Where branches might droop under the weight of snow or ice, provide extra
clearance.
Structures
Bridges
Bridges installed on cross-country ski trails increase the season of
use. Small streams that freeze solid do not always require bridging.
-
Design bridges wide enough for tracks and poles, and strong enough to support
grooming equipment.
-
Use railings if the bridges are high. Consult an engineer if the bridge
span or design requires special attention.
-
Use brush-filled crossings for shallow streams not requiring bridging during
other seasons. Lay the brush piles across streams in late fall, thickly
enough to ensure that the snow layer will be well above the water level.
Cabins
-
Consider cabins or wind shelters on cross-country ski trails. Locate shelters
at main trail junctions or other areas where they can be used by a maximum
number of people.
-
Provide accommodation at intervals which can be readily travelled in one
day. The lengths of these intervals will depend on terrain conditions and
skier ability. For average tourers, intervals of 15 to 20 km may be used.
If adverse weather conditions are prevalent in an area, a 15 kin interval
is preferred for safety reasons.
Provide winter use cabins with wood stoves and sufficient storage space
for firewood. In coastal or other areas with heavy snowpack, consider wood
storage on the ground floor, with the winter entrance on the second floor.
Signs and Safety
-
Use the international recognized sign standards for Easiest, More
Difficult and Most Difficult trails. Refer to Cross-country
and Ski Touring Development Guidelines B. C. Parks.
-
Use signs to provide information and improve safety on the ski trails.
Provide information on trail lengths, layout and facility locations at
the trailhead. Provide standard signs at all trail junctions.
-
Provide signs at all intersections to indicate the route home, difficulty
level and other information. Design trail markers to be visible in poor
weather and placed them where they will not be buried by snow. Display
at least two of three elements on all trail signs: the symbol for
degree of difficulty or any required warnings, directional arrow, text
on distance to end of trail or the name of trail.
-
Avoid avalanche areas and hazardous lake and stream crossings. A minimum
of 15 cm hard blue ice is necessary for safe crossing on lakes or streams.
Avoid routing trails under cliffs.
-
Avoid dense tree canopies, particularly in tall, old-growth stands. The
canopy intercepts much of the snowfall and when temperatures rise, large
chunks of snow may fall onto the trail.
|