| 7.9 Select and Build Trail Structures
7.9.1 Drainage
Surface and subsurface water along the trail poses problems for construction
and maintenance. Assess the nature and severity of potential drainage problems
prior to finalizing the trail alignment and construction method. Use several
proven techniques to control surface water drainage. Consider alternative
design solutions for drainage structures. For example, reduce maintenance
by using drainage dips instead of culverts.
Crowns and Cross-slopes
-
Trail surface crowns shed water in two directions. Crowns are suitable
over level ground or where trail ditching is constructed on both sides
of the trail.
-
Cross-slopes shed water to the outside of a slope. Prevent the formation
of rutting on the trail by using crowns or cross-slopes.
Drainage Dips
Drainage dips are incorporated into the trail tread during initial stages
of construction by reversing the prevailing grade for a distance of 4-5
m or more. Drainage dips divert run-off from the trail tread. Drainage
dips are effective, inexpensive, and do not detract from the natural setting.
(See Detail #8)
-
intercept water on slopes and shed it to the outside of the trail. Construct
cross-drains with log rounds, squared rough-cut timbers, or local rocks.
(See Detail #14)
-
Excavate a trench at an angle across the trail tread to place logs or rocks.
Crossdrains should reinforce the correct angle and slope to allow the self-flushing
of fine sediments. Place coarse granular fill or cobble rocks on the uphill
side of the drain. Extend the porous material beyond the edge of the trail
tread. Backfill around the drain structure as required. Ensure the drain
structure is flush with the trail surface. Compact the backfill.
-
Avoid the use of log cross-drains on bicycle trails, since they may have
a slick surface and cause cyclists to slip.
Table 8: Frequency of Cross Drains in Metres
| Material Type |
Grade in % |
|
2 |
4 |
6 |
8 |
10 |
12 |
15 |
|
|
|
|
|
|
|
|
| loam |
100m |
50m |
30m |
25m |
15m |
- |
- |
| sandy clay |
150m |
100m |
75m |
50m |
30m |
15m |
- |
| clay |
- |
150m |
100m |
75m |
50m |
30m |
25m |
| gravel or round rock |
- |
- |
250m |
150m |
100m |
75m |
50m |
| shale or angular rock |
- |
- |
275m |
200m |
125m |
100m |
75m |
Figure 7: Typical Drainage Depression

7.9.2 Bridges, Culverts and Boardwalks
-
Use bridges to cross rivers, streams, wetlands or areas of shallow water
that are unsafe to cross, or where uncontrolled crossing would result in
unacceptable environmental impacts. Consider stream flow characteristics,
bank and stream bed erosion potential, fish habitat, peak run-off periods,
snow loads and ice conditions. Provide adequate boat clearance on navigable
watercourses. Select a suitable bridge design based on the expected type
of use, span, available local materials and location.
-
Use plastic or metal culverts on small drainage ways, where drainage dips
or other structures will not be adequate. Select a suitable size to accommodate
seasonal high water levels, and set at a level that will not interfere
with drainage. Place rocks around the ends of the culvert to stabilize
the fill material and hide the ends of the pipes. Alternatively, cut the
pipe ends back at a 45 degree angle to reduce the visual impact of the
culvert. Place 10 cm of granular surfacing over the pipes.
-
Consider rock culverts constructed with local materials. Hand place rocks
in an excavated trench to form a rock-bordered channel.
Simple Bridges
-
Place stepping stones across minor drainage swales and streams. Avoid stepping
stones if flood conditions would make the crossings impassable.
-
Construct bridges during the late summer or fall when the stream banks
are dry and -stable. Record the spring high water mark and build the bridge
at least .5 in above that mark where feasible.
-
Use one or two-log bridges where the crossing is relatively free of hazards,
and the amount of use is low. On two-log bridges place the trunk stems
in opposite directions for maximum strength.
-
Select trees that are straight and most uniform in diameter and with the
least amount of branches. Peel the logs.
-
If the log is more than 12" in diameter at its thinner end, use one stringer.
Otherwise, use two stringers side by side. Cut the corresponding notches
in such a way that their sides, rather than the bottoms are touching. This
will ensure a snug fit and will prevent rocking of the stringers sideways.
-
Top the logs by making cross-cuts with the chain saw, two inches apart,
then cutting off the sections with an axe or a mattock. Use diagonal cross-cuts
1/4" deep over the flat surface of the topped log to prevent slipping.
-
Use rocks or soil fill to stabilize bridge ends.
-
Limit the bridge span according to the size of the log. Ensure the log
spans over the water course and extends at least I metre over each bank.
Secure the log ends with rock rip-rap or timber cribbing. Flatten the top
surface of the logs for easier and safer walking. Construct a hand-rail
on bridges over hazardous crossings.
-
Try to install the bridge abutments at the same level to prevent a slop
across the bridge. Log bridges are slippery when wet.
Timber Bridges with Decking
-
Construct log or timber bridges with decking for Type I foot trails, horse
and bicycle trails. Place plank decking with 10-20 mm spacing for drainage
and air circulation. Use timber wheel stops on low level crossings and
hand-rails where the bridge is more than 1.2 m above the water.
-
Consider using raised galvanized metal brackets to hold stringers in place
and help prevent wood rot.
-
Try to use one stringer span to cross creeks. Centre piers may cause debris
to get caught in mid-stream, and the bridge may be swept away. If long
enough stringers are not available locally, consider using a cable suspension
bridge or other method. If flooding and debris are not a problem, support
every bridge section longer than 4 m by a crib or gabion. Design bridges
to support large mammals such as moose.
Figure 8: Single Log Bridge with Handrail
 Table 9: Log Bridge Span Table
| Span |
Minimum Log Diameter |
| 2 - 6 m |
250mm |
| 6 - 8 m |
325 min |
-
Use custom designed bridges for spans over 5 in, or over hazardous waters.
Consider suspension bridges for long spans to reduce construction and maintenance
costs.
-
In wetland areas, allow for adequate drainage channels and variable water
levels. Place the bridge above the maximum water level.
Cordwood Crossings
-
Place peeled logs directly on the ground in approximately 2.5 to 3 in sections
and secure with stakes at either end. Leave spaces of at least 35 cm between
sections to allow for drainage channels.
-
Use log stringers or boulder edging with granular fill to contain trail
treads in soft areas. This is called a turnpike: the parallel placement
of peeled logs (min. of 20 cm) with a fifteen centimetre lift of rock placed
in between for the tread surface. Depending on the type of trail use, place
the logs either two or two and a half metres apart. Secure log stringers
with wood stakes and set boulders well below the surface. Use this type
of tread armor where ditches are required on both sides of the trail. Turnpike
structures are less expensive than puncheons or corduroys.
Stringer and Decking Boardwalks
-
Avoid open water bodies, except to provide interpretive or wildlife viewing
opportunities.
-
In low use areas, or where soil conditions permit, place timber or log
decking directly on sills. In higher use areas, or in wetter areas, construct
a log or rock sill on the ground level. Secure stringers to the sill and
fasten decking perpendicular to the stringers.
-
If log decking is used, split the logs and lay them down in an alternating
fashion, first with the rounded side down, then up.
-
Use floatation devices in place of sills to cross areas of standing water.
Consider airfilled drums or encased styrofoam blocks. Anchor floatation
devices to the bottom of the water body.
-
Alternatively, drive posts into the bottom of the water body, and secure
the bridge to posts with rings that allow the bridge to float up or down
depending on water levels. If water levels do not fluctuate, fasten the
bridge stringers to the posts.
-
Use flexible plank decking on walks over sand. This form of bridging helps
to control erosion. Drill a lateral hole through each end of the planks
and then string the planks together with twisted galvanized cable.
7.9.3. Steps, Ladders and Walls
-
Construct steps on short, steep trail sections to ensure user safety and
help prevent soil erosion.
-
Provide landings between short flights of 14 steps or less. Avoid long
flights of stairs. Install handrails on at least one side of the steps
where flights are steep or long.
-
Avoid stair flights with less than three steps since they may not be noticed
by pedestrians.
-
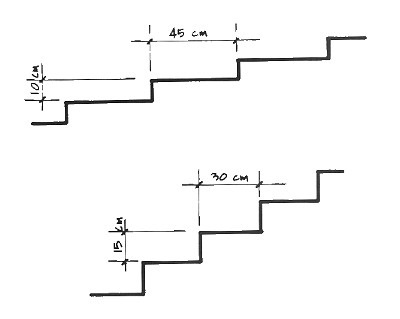
Use acceptable riser height to tread depth proportions in step construction.
Use a formula where the riser height times the tread depth equals 450 cm.
For example, a rise of 10 cm requires a 45 cm tread depth, whereas a 15
cm rise requires a 30 cm tread depth. Ensure tread depths are at least
30 cm or more.
-
Design the steps to suit the terrain conditions, slope and intended type
of trail use.
Log or Timber Risers
-
Select logs or rough sawn timbers to build risers placed at grade. Excavate
the route for the risers. Fasten the risers to the ground with iron rebars
or connect the risers with timber supports or metal brackets. Backfill
and compact the tread surface.
-
To build curved steps on a slope, follow the contour of the land to minimize
site disturbance. Draw a lime line to show the desired curve. Use railway
ties (15 cm x 20 cm) or other rough sawn timbers for the steps. Vary the
spacing according to the slope.
Figure 9 Rise to Run Ratio for Steps
Steps on Stringers
-
Use steps on stringers in high use areas or where rock, sand or roots make
it difficult to set steps into the ground.
-
Use rough sawn, timbers and galvanized nails and bolts for all step construction.
-
Consider boulder steps if local rock is available. Set boulders into the
slope. Fill the tread area with smaller rocks and granular material.
Ladders
-
Use ladders on trails designed for more agile hikers where grades exceed
a 1: 1 slope. Construct the ladder from on-site materials or build a timber
slat and cable ladder.
-
Use a flexible cable and wood slat ladder on sand. This form of step helps
to control erosion. Drill a lateral hole through each end of the wood slats
or planks and then string the planks together with twisted galvanized cable.
Barriers
-
Use trail edge barriers at hazardous sites such as cliffs. Consider barriers
to protect ecologically sensitive areas from user traffic or to prevent
vehicle access to nonmotorized trails. Construct barriers with logs, timbers,
stones or boulders, depending on the availability of materials.
-
Use stiles and dodgeways to form barriers that block motorcycle access
to foot trails.
Retaining Walls
-
Use log or dry wall rock retaining walls where the leveling of necessary
tread width will excessively steepen the downhill slope of the trail. Timber
structures vary in complexity from a local single height log anchored with
local stakes to walls composed of pressure treated logs and stakes, anchored
with deadmen, up to four logs high. (See Details
#26).
|